Twas the shite before Christmas, when outside was froze,
not an inch wasn't covered, not even my nose.
My wellies were sloshing, with warm runny gunk,
and fast pace of walking, had coated my junk.
The fart I expected, arrived way too fast,
and brought with it solids, in one liquid blast.
The stench was amazing, and the crisp morning air,
was putrid with wretching, as I dashed home with care.
My eyes were both streaming, as I got to my door,
my backside was stinging, I could take it no more!
So learn from this lesson, and please tell a friend,
don't reheat old curry from before last weekend!
(by Chris Thomas - 15 Dec 2016)
Sunday, October 29, 2017
Thursday, October 26, 2017
Magic Mirror - build part 3
So, my magic mirror had been hanging in the living room above the fireplace, happily serving information for a few weeks, when May 2017's issue of the MagPi magazine (issue 57) was published, containing some rather spectacular electronic gubbins, the Google AIY Project kit (Artificial It Yourself)! A big speaker cone, wires, arcade style button, and a Voice HAT printed circuit board, enabling you to build your own version of Google's Home voice assistant, all free with the magazine. I had to have one!

Publication day came, and I tried at least 5 different stores, all of which did NOT have a copy or had already sold out. My wife eventually found and reserved a copy that was still available (thanks Sainsbury's Shrewsbury!) and we were able to pick it up the following Saturday from the customer service desk. Phew! We also found some additional copies on the shelves in the main store... I had them too!
I also ordered a brand new Pi3 and built it into the cardboard version. This was to become my test unit to see how to install and configure it, and to see if it really was actually worth the effort to cram it inside the magic mirror. The cardboard build seemed to go relatively smoothly, if a bit fiddly, however the instructions in the magazine didn't quite match with the necessities of reality (if I recall correctly, there was a file renaming step missing) but after some further troubleshooting, it eventually worked really well. Run the code, press the button, talk, and receive an answer. Super!

Next problem. If I was going to build this into the mirror, I didn't want to have to press the button to activate the assistant, nor worry about where to position or how to mount it. Luckily, there were additional instructions on the following pages to circumvent the button push, and move to a 'clap clap' trigger, which also worked. There also appeared to be further instructions to change the clap trigger to using the hot words "Hey Google", so I also tested that with similar success. A hands-off voice assistant it was to be then!
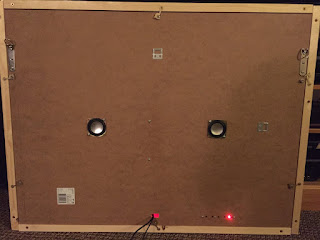
The major problem though, was with the additional height of the larger speaker cone, and the VoiceHAT board on top of the Raspberry Pi.

There are two little white plastic connectors (one for the microphone, and one for the pushbutton, which increased the height required beyond the 2cm of space available inside the mirror.

I considered a couple of solutions. Cutting more holes in the backing board for the components to poke out felt inelegant, would look messy and may affect how the mirror hangs on the wall. Equally, extending the GPIO ports with an IDE cable might work electronically, but I didn't even bother testing that because that configuration would still not have fit in the space available.
I really wasn't sure how to proceed, and found my mind wandering. My daughter was watching Dr Who, rather loudly in her bedroom next door. He wouldn't have this problem, because his Tardis is bigger on the inside... Therefore the only solution was to steal some Timelord technology and actually make the inside bigger...
...ah-ha!

Thanks to that flash of inspiration, it would be a relatively simple modification to tack on some additional 20mm strips of wood to make the 'walls' of the backing board higher.

Then, after carefully removing the brass clasps, do exactly the same with the outer frame. Wood glue the strips into place first, then drill pilot screw holes for extra security, and reattach brass hooks.

Hey presto, extra room!

New blocks of wood were cut and glued on top of the existing ones to increase the height of the screen mounts to again push the screen against the inside of the glass pane.

Some additional scraps were used to hold the new speaker cone in place. Unfortunately, it completely threw off all sense of symmetricality, but as it's all neatly hidden inside it only bothers me when I think about it... :)

The microphones are not permanently affixed, and are instead woven between other cables and left to dangle slightly, but not so much that they push up against the inside of the black card and glass. The mics are quite sensitive, so being inside a glass picture frame with a large, sound deadening bit of thick card in the way doesn't actually seem to be a problem at all.

Back on the wall, and configuring by remote was a bit more of a trial. There are instructions available for you to install the required software manually, and I followed those. The Google AIY stuff worked pretty much first time, but I had problems configuring regular audio output for my timebonger script. Again, I didn't leave myself any notes on what I did to eventually get this working, but it took many attempts and lots of Googling. I might have just chosen an alternate output device from the volume control's wiget on the menu... can't actually remember!
Finally, everything was working smoothly!
Coming up... Magic Mirror Build Part Four - Everything stopped working smoothly!
Monday, October 23, 2017
What I want is a proper hookey copy
(To be sung to the tune of "What I want is a proper cup o' coffee")
A fat man sat, in a popcorn covered seat, in a cinema in downtown Barking,
The audience, were noisy, and the kids,
We're running, up and down, and talking,
Ah curse ya, curse ya, curse ya, it's the worst theatre I've been caught in!
'Cause,
All I want is a proper hooky copy,
Made by a pirate movie copier,
I did download a lot,
'Cause I want a cheap ass copy, and don't want to pay a jot!
Pirate Bay's blocked!
Links sites are cocked!
They're no use to me!
If I can't have a proper hooky copy from a pirate movie copier, I'll buy the DVD!
In days of old when pirates were bold, they would sneak a camera in, to the cinema,
The focus was off, you'd hear other patrons cough, and they'd wander in front of the camera,
They were the worst movie copies! I felt anger!
Chorus
Then the DRM was cracked, it was a breeze, to, churn out copies by the dozen,
And the blank disk prices tumbled to a point, you would make free copies for your cousin!
I just hope there's no repercussion!
Chorus
(a three verse version of the lyrics by Chris Thomas - 31 August 2012)
Here's a version of the proper lyrics featuring the marvelous Bernard Cribbins...
Thursday, October 19, 2017
Magic Mirror - build part 2
Quick modification this. I wanted my magic mirror to play a sound effect on the hour, but for that, it would need some speakers. I found the cheapest USB powered speakers I could find on eBay to experiment with, and if I broke them, it wouldn't be the end of the world.
They were surprisingly quite chunky, but were easy enough to open and unscrew...

However, I had to break the back end of each speaker box because the wires were threaded through a tiny hole, which wouldn't allow the plug ends through, and I also didn't want to have to desolder the wires. Two pairs of pliers made short work of breaking apart the moulded plastic, and removing the hot glue that held the volume knob PCB in place.

Next, after a few attempts to work out optimal positioning for the speakers, and to keep everything OCD symmetrical (very important) the mounting holes were marked and drilled and cut...

Superey dupery! Next, the plan required that I was to bolt the speaker cones inside the mirror, however... catastrophe! They were several millimetres too tall to fit inside the case! Daaahhh!
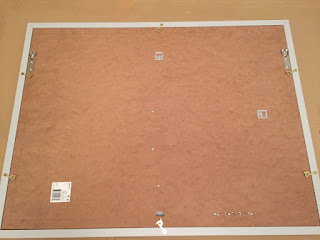
There really was no other option than to mount the speakers on the outside of the backing board, which meant that I had to desolder the wires anyway, taking care to remember which way round the wires went originally.

Some delicately balanced soldering later, the speakers were rewired, and even though they're mounted on the outside, they don't protrude too much, and don't affect how it hangs on the wall.
I first tried plugging the audio plug straight into the Pi's audio out, but it was way too hissy. Luckily, the screen driver board also has a standard audio out socket, and all that was required was to fiddle with some configuration files* to force audio out of the HDMI lead. Luckier still, it's no where near as hissy as the Pi direct audio connection.
(* This earlier incarnation of the magic mirror used an older vanilla version of Raspbian Jesse. I think I had to uncomment or add some specific HDMI options in /boot/config.txt to get the audio to work properly through the screen driver board, though I didn't leave myself any notes and can't remember exactly what I did)
So, now to the business of automating a python script to play audio on the hour.
I've only used python a little, but from what I have done, I was able to reuse some previously written functions to get things moving along. The hardest part, as with every software engineering project, is to come up with a suitable name. After thinking long and hard about it, it was named "timebonger.py"!
Not very elegant, I'm sure you'll agree, but it gets the job done, and makes me giggle EVERY SINGLE TIME. Can't remember where I got the sound effect from (it took me a while trying to find a suitably funny one, eventually I settled on a cartoon sounding cuckoo clock), but you could probably Google the filename to locate it. You may also notice that I've limited the script to only play the sound between the hours of 7am to 11pm, because I don't want it to 'bong' throughout the night and piss my family off!
To get the timebonger script to auto run on restart, I used the pm2 scheduler that I'd previously installed to get the Magic Mirror package to auto run. As the recommended method for the magic mirror suggests, I created a small shell script, /home/pi/timebonger/tb.sh which contained the single line:
python /home/pi/timebonger/timebonger.py
...which executes python and passes a fully qualified directory path to the timebonger script, then I made it executable with:
sudo chmod +rwx timebonger.py
...then added it to pm2 with:
pm2 start tb.sh
pm2 save
pm2 is itself already autostarted from /etc/rc.local (which I believe I setup by executing 'pm2 startup systemd' because Raspbian uses systemd) so that's job done! Everything auto runs on reboot without me having to touch anything.
So, the last part was to carefully measure out exactly where the wall hooks had to go so I could drill holes for wall plugs and mount it over the fireplace in the living room, leaving everything level and symmetrical. After much headscratching, measuring multiple times, umming, ahhhing, pencil marks, and aching arms, I managed to get it right first time!

Coming up in part three - the Google AIY (Artificial It Yourself) version!
- Cheap USB speakers £2.69
They were surprisingly quite chunky, but were easy enough to open and unscrew...

However, I had to break the back end of each speaker box because the wires were threaded through a tiny hole, which wouldn't allow the plug ends through, and I also didn't want to have to desolder the wires. Two pairs of pliers made short work of breaking apart the moulded plastic, and removing the hot glue that held the volume knob PCB in place.

Next, after a few attempts to work out optimal positioning for the speakers, and to keep everything OCD symmetrical (very important) the mounting holes were marked and drilled and cut...

Superey dupery! Next, the plan required that I was to bolt the speaker cones inside the mirror, however... catastrophe! They were several millimetres too tall to fit inside the case! Daaahhh!
There really was no other option than to mount the speakers on the outside of the backing board, which meant that I had to desolder the wires anyway, taking care to remember which way round the wires went originally.

Some delicately balanced soldering later, the speakers were rewired, and even though they're mounted on the outside, they don't protrude too much, and don't affect how it hangs on the wall.

I first tried plugging the audio plug straight into the Pi's audio out, but it was way too hissy. Luckily, the screen driver board also has a standard audio out socket, and all that was required was to fiddle with some configuration files* to force audio out of the HDMI lead. Luckier still, it's no where near as hissy as the Pi direct audio connection.
(* This earlier incarnation of the magic mirror used an older vanilla version of Raspbian Jesse. I think I had to uncomment or add some specific HDMI options in /boot/config.txt to get the audio to work properly through the screen driver board, though I didn't leave myself any notes and can't remember exactly what I did)
So, now to the business of automating a python script to play audio on the hour.
I've only used python a little, but from what I have done, I was able to reuse some previously written functions to get things moving along. The hardest part, as with every software engineering project, is to come up with a suitable name. After thinking long and hard about it, it was named "timebonger.py"!
#!/usr/bin/env python
#import libraries
import sys
import time
import signal
import datetime
import subprocess
from time import sleep
#define global variables
blnStopped=False
#exit when received SIGTERM or SIGHUP
def stop(sig, frame):
global blnStopped
blnStopped=True
print "caught signal ", sig, " exiting"
signal.signal(signal.SIGTERM, stop) #-15
signal.signal(signal.SIGHUP, stop) #-1
def runcmd(strCommand):
print "runcmd() strCommand='" + strCommand + "'"
try:
output = subprocess.check_output(strCommand, shell=True)
output = output.strip('\n')
output = output.strip('\r')
output = output.strip('\t')
output = output.strip(' ')
#print "output=" + output
except Exception:
return "error"
return output
def mainloop():
global blnStopped
print "mainloop() started"
dteNow=datetime.datetime.now()
intHourNow=dteNow.hour
intNextHour=intHourNow+1
if(intNextHour>=24):
intNextHour=0
intMinuteNow=dteNow.minute
intNextMinute=intMinuteNow+1
if(intNextMinute>=60):
intNextMinute=0
try:
while(not blnStopped):
dteNow=datetime.datetime.now()
intHourNow=dteNow.hour
intMinuteNow=dteNow.minute
#print "mainloop() dteNow=" + str(dteNow) + " intNextHour=" + str(intNextHour) + " intNextMinute=" + str(intNextMinute)
if(intMinuteNow==intNextMinute or intHourNow==intNextHour):
#print "mainloop() New minute!"
#prepare time output
strMinute=str(intMinuteNow)
if(intMinuteNow==0):
strMinute="o'clock"
strHour=str(intHourNow)
if(intHourNow==0):
strHour="midnight"
strMinute=""
if(intHourNow==12):
strHour="midday"
strMinute=""
#do we run now?
if(intHourNow>=7 and intHourNow<=23 and intMinuteNow==0):
print "mainloop() Bing Bong! The time is " + strHour + " " + strMinute
runcmd("aplay --device=sysdefault /home/pi/timebonger/cuckoo_clock1_x.wav")
#calculate next minute
if(intMinuteNow==intNextMinute):
intNextMinute=intNextMinute+1
if(intNextMinute>=60):
intNextMinute=0
if(intHourNow==intNextHour):
intNextHour=intNextHour+1
if(intNextHour>=24):
intNextHour=0
sleep(1)
sys.exit(1)
except KeyboardInterrupt:
print "mainloop() Keyboard Interrupt!"
sys.exit(1)
mainloop()
Not very elegant, I'm sure you'll agree, but it gets the job done, and makes me giggle EVERY SINGLE TIME. Can't remember where I got the sound effect from (it took me a while trying to find a suitably funny one, eventually I settled on a cartoon sounding cuckoo clock), but you could probably Google the filename to locate it. You may also notice that I've limited the script to only play the sound between the hours of 7am to 11pm, because I don't want it to 'bong' throughout the night and piss my family off!
To get the timebonger script to auto run on restart, I used the pm2 scheduler that I'd previously installed to get the Magic Mirror package to auto run. As the recommended method for the magic mirror suggests, I created a small shell script, /home/pi/timebonger/tb.sh which contained the single line:
python /home/pi/timebonger/timebonger.py
...which executes python and passes a fully qualified directory path to the timebonger script, then I made it executable with:
sudo chmod +rwx timebonger.py
...then added it to pm2 with:
pm2 start tb.sh
pm2 save
pm2 is itself already autostarted from /etc/rc.local (which I believe I setup by executing 'pm2 startup systemd' because Raspbian uses systemd) so that's job done! Everything auto runs on reboot without me having to touch anything.
So, the last part was to carefully measure out exactly where the wall hooks had to go so I could drill holes for wall plugs and mount it over the fireplace in the living room, leaving everything level and symmetrical. After much headscratching, measuring multiple times, umming, ahhhing, pencil marks, and aching arms, I managed to get it right first time!

Coming up in part three - the Google AIY (Artificial It Yourself) version!
Tuesday, October 17, 2017
New Clicky Keyboard
My wife loves me! She bought me an expensive new mechanical keyboard, with nice tactile clicky keys that are a dream to type with, and evoke a bygone age of solidly built, albeit beige, computing.
 I didn't want to make a mistake by buying a keyboard I wouldn't actually like, so my research consisted of watching a load of YouTube videos with people testing all sorts of switches. Also, I was pleased to discover that you can buy switch testers from eBay, which allows you to actually hear and compare what the different mechanical switches feel like. I bought a nine-key one for about £7, and it was very useful to compare the type of switches that are available. I decided that the Cherry MX Blue switches were the best of the bunch for me.

The keyboard is Bluetooth capable and interestingly it's USB cable can be removed, so can be wired and not require batteries, or be completely wire free.
I wrote a brief product review for the website that I purchased it from...


The keyboard is Bluetooth capable and interestingly it's USB cable can be removed, so can be wired and not require batteries, or be completely wire free.
I wrote a brief product review for the website that I purchased it from...
Great keyboard! Solidly constructed, and very very nice to type on. I can almost feel my typing speed and accuracy getting better! Yes, they're a bit noisier than a standard cheap USB keyboard, but really not by much. Pairing is straightforward, though I could actually do with more than 4 pair slots! The only problem I've had is that the @ and " symbols (and a few others) are swapped when paired to an iPhone and iPad, and there doesn't seem to be a way to change either the keyboard or iDevice's configuration. However, I'm still very impressed, and I'm considering getting a second one for work!Does anyone know how to fix the iPhone/iPad swapped key problem?
Monday, October 16, 2017
Magic Mirror - build part 1
February 2017's issue of The MagPi magazine (issue 54) caught my eye in a supermarket, because it featured a 'magic mirror' build project. I thought it was a great idea, and since I had a couple of Pis sitting around, and just had to build one!
First, can I get it to work? I figured that I'd use the Pi Zero, because it's a very small device, and would have the best chance of fitting it in a suitable picture frame. I managed to get an image running, but it did seem to be terribly slow, and I hoped to be able to run a few other services on it in the future, so I plumped for getting a version running on the larger and more powerful Pi3. Here is the image, with a few configured modules, running on my 23" main monitor...

Configuring the modules was straigtforward enough, as long as you read their instructions.
So far so good, on to the difficult part of getting all the right bits.
I did all the standard things... find a cheap laptop screen on eBay, then Google the model number to find a compatible HDMI screen driver, and agonised over picking the correct power supply for it. I wanted to be a complete cheapskate in this build, and don't want to blow anything up in the process. Double and triple checking was a necessity! A few hours later, the main electronic bits are ordered.
Once all the bits turned up, time to see if it all works...

...success!
Now, all this needs to be crammed into a picture frame. I needed one that would give me enough room to fit the 'tallest' component, which turns out to be the Pi itself, at just over 2cm, from the top of the USB ports to the bottom of the pins sticking out on the bottom. Plus this mirror was intended to replace the big mirror in our living room above the fireplace. I found just the right frame from B&Q for about £15. It's the sort that you have to bend a bunch of little metal tabs down to keep the picture sandwiched between the backing board and the glass, but it was deep enough that it would just about fit the Pi inside the frame with the backing board remaining flush with the back of the frame. A pair of pliers was required to remove the metal tabs.
B&Q have had a lot of my money thanks to this project! Some 2cm wide strips of wood were purchased, and glued to the inside of the backing board to make an inner frame. Some smaller and shorter bits were used to hold the screen display in place...

The screen is 4mm deep, so some other pieces that were 16mm high were used to prop the screen up from underneath, this allowed me to hold the screen right up against the glass to minimise internal reflections when finally complete. Clever, huh? ;)

A few other scraps were used to help keep the driver board and Pi in position.

Here the backing board and inner frame is fitted inside the main frame 'in reverse' to show how much room is left for the glass. It all fits!
Next, more nerve wracking stuff... fixing the mirrored surface to the glass!
I had to re-read the instructions a number of times, to wrap my head around which sides of film and glass I was supposed to cover in 'slip solution' (soapy water) and to get the steps in the right order. I decided to trim the film before affixing to the glass, rather than afterwards as recommended, because I worried that I'd cause more damage to the reflective film by trimming it after sticking it than before.

Handy hint: I used a small scrap of film to test how to separate the backing from the film with a bit of sellotape. Also, you can see the definite difference between silvery 'front' and see-through 'back' sides of the one way film...

It was tricky to squeegie the trapped water out, and keep all the edges aligned. Here's the final squeegied result...

I planned to use the original picture frame card to separate the inner wood frame from the one-way film, and trim out the bits where the screen is, however, after putting it all together, the white card was actually quite visible through the one way film. Not good enough! Here it can be seen, with some A4 white paper taped to it, that I used to mark out a template for the exact size and position of the screen hole...

One trip to a local stationers later, I've obtained a large A2 piece of black card, easily trimmed to size using the backing board as a template. The paper template above worked perfectly to let me work out exactly where the hole for the screen display needed to be.

The only downside is that it was half a centimetre too short!

Again, some scraps of card were carefully trimmed to provide the last few millimetres and taped in place.

Even the cut inner edge of the black card reflected enough light back through the one way film to be visible, so a trusty Sharpie was employed to deal with the problem...

Some admittedly not-very-neatly placed holes were drilled to allow the screen control buttons to poke through the backing board...


Lastly, the heavy duty picture hanging loops were affixed to the backing board (being drilled through to the inner wooden frame) and the brass hooks were added with some little self tapping wood screws to hold everything together. It also became a necessity to drill a couple of holes for some more M3 bolts to hold the Pi and driver board down, otherwise, they'd keep falling out when ever I tried to put the inner frame into the outer frame.
And with a super pleased and self satisfied grin, here it is on the floor, finally assembled and booted!

That was build Phase One. It sat on the floor in the office for a month before I found the time to move on to Phase Two...
First, can I get it to work? I figured that I'd use the Pi Zero, because it's a very small device, and would have the best chance of fitting it in a suitable picture frame. I managed to get an image running, but it did seem to be terribly slow, and I hoped to be able to run a few other services on it in the future, so I plumped for getting a version running on the larger and more powerful Pi3. Here is the image, with a few configured modules, running on my 23" main monitor...

Configuring the modules was straigtforward enough, as long as you read their instructions.
So far so good, on to the difficult part of getting all the right bits.
I did all the standard things... find a cheap laptop screen on eBay, then Google the model number to find a compatible HDMI screen driver, and agonised over picking the correct power supply for it. I wanted to be a complete cheapskate in this build, and don't want to blow anything up in the process. Double and triple checking was a necessity! A few hours later, the main electronic bits are ordered.
- 15.6" screen £25
- HDMI Audio Controller Board Driver £13
- Screen Power Supply £7
- Short HDMI cable £3
- Pi 5v 3A power supply £3
Once all the bits turned up, time to see if it all works...

...success!
Now, all this needs to be crammed into a picture frame. I needed one that would give me enough room to fit the 'tallest' component, which turns out to be the Pi itself, at just over 2cm, from the top of the USB ports to the bottom of the pins sticking out on the bottom. Plus this mirror was intended to replace the big mirror in our living room above the fireplace. I found just the right frame from B&Q for about £15. It's the sort that you have to bend a bunch of little metal tabs down to keep the picture sandwiched between the backing board and the glass, but it was deep enough that it would just about fit the Pi inside the frame with the backing board remaining flush with the back of the frame. A pair of pliers was required to remove the metal tabs.
B&Q have had a lot of my money thanks to this project! Some 2cm wide strips of wood were purchased, and glued to the inside of the backing board to make an inner frame. Some smaller and shorter bits were used to hold the screen display in place...

The screen is 4mm deep, so some other pieces that were 16mm high were used to prop the screen up from underneath, this allowed me to hold the screen right up against the glass to minimise internal reflections when finally complete. Clever, huh? ;)

A few other scraps were used to help keep the driver board and Pi in position.

Here the backing board and inner frame is fitted inside the main frame 'in reverse' to show how much room is left for the glass. It all fits!
Next, more nerve wracking stuff... fixing the mirrored surface to the glass!
- One Way Privacy Window Film £10
- Brass plated side hooks £3
- Heavy Duty Picture and Mirror Hanging Kit £4
- M3 nuts and bolts £3.25
I had to re-read the instructions a number of times, to wrap my head around which sides of film and glass I was supposed to cover in 'slip solution' (soapy water) and to get the steps in the right order. I decided to trim the film before affixing to the glass, rather than afterwards as recommended, because I worried that I'd cause more damage to the reflective film by trimming it after sticking it than before.

Handy hint: I used a small scrap of film to test how to separate the backing from the film with a bit of sellotape. Also, you can see the definite difference between silvery 'front' and see-through 'back' sides of the one way film...

It was tricky to squeegie the trapped water out, and keep all the edges aligned. Here's the final squeegied result...

I planned to use the original picture frame card to separate the inner wood frame from the one-way film, and trim out the bits where the screen is, however, after putting it all together, the white card was actually quite visible through the one way film. Not good enough! Here it can be seen, with some A4 white paper taped to it, that I used to mark out a template for the exact size and position of the screen hole...

One trip to a local stationers later, I've obtained a large A2 piece of black card, easily trimmed to size using the backing board as a template. The paper template above worked perfectly to let me work out exactly where the hole for the screen display needed to be.

The only downside is that it was half a centimetre too short!

Again, some scraps of card were carefully trimmed to provide the last few millimetres and taped in place.

Even the cut inner edge of the black card reflected enough light back through the one way film to be visible, so a trusty Sharpie was employed to deal with the problem...

Some admittedly not-very-neatly placed holes were drilled to allow the screen control buttons to poke through the backing board...


Lastly, the heavy duty picture hanging loops were affixed to the backing board (being drilled through to the inner wooden frame) and the brass hooks were added with some little self tapping wood screws to hold everything together. It also became a necessity to drill a couple of holes for some more M3 bolts to hold the Pi and driver board down, otherwise, they'd keep falling out when ever I tried to put the inner frame into the outer frame.

And with a super pleased and self satisfied grin, here it is on the floor, finally assembled and booted!

That was build Phase One. It sat on the floor in the office for a month before I found the time to move on to Phase Two...

Sunday, October 15, 2017
Toilet ghost
The little roll bounced to the floor,
and from the stall, rolled 'neath the door.
A desperate cry was heard to shout,
"Would some kind soul, please help me out!
My bottom's dirty, I need to wipe,
if I leave now, I'll stink all night!"
With much relief, the roll returned,
was used, replaced, and lesson learned.
He left red faced, emerging slow,
wishing no one would have to know.
He turned to thank the silent friend,
but the room was empty from end to end.
The door was shut. No one was there.
A sudden chill hung in the air.
He didn't stop to look around,
and the ghostly help, was never found.
Should you be stuck with a similar plight,
in a similar place, on a similar night,
do not be scared, don't scream or shout,
the bog roll ghost might help you out.
(by Chris Thomas - 14 November 2014)
My Beard
I had a beard. Have you hear'd?
I thought it weird, when people jeered.
Their anger neared... my journey veered!
But when I peered, they hadn't leered,
they merely cheered (from seating, tiered).
My worry cleared! Should not have feared.
Then up I geared and face was sheared.
I miss my weird, old hairy beard.
(by Chris Thomas - 27 July 2010)
The computer's prayer
Our server,
which art in Windows.
Reboot be thy name.
Thy bluescreen comes, thy reset be done,
right now, and whenever you feel like it.
Give us this day, a bloody break,
and forgive us our piracy,
as we forgive those who spam viagra against us,
and lead us not into a virus,
but deliver us from Microsoft.
For thine is the hard disk,
the network and the mouse clicks,
forever and ever,
general protection fault.
(a version of "The Lord's Prayer" by Chris Thomas - circa 2003)
Saturday, October 14, 2017
I don't like shopping
I hate shopping.
My wife and I were in Primark. I'd already been phone-zombying on her shirt tails for a good five minutes when she dragged me from my cyber reverie...
My wife and I were in Primark. I'd already been phone-zombying on her shirt tails for a good five minutes when she dragged me from my cyber reverie...
Wife: Balls!
She had spotted some Harry Potter branded Christmas decorations. A four pack of baubles.
She had spotted some Harry Potter branded Christmas decorations. A four pack of baubles.
Me: You want Harry Potter's balls dangling on our tree?
Wife: Let's have a pair.
She picked up two packs.
Me: Technically that will be four pairs...
Hello
Hi there! I am Chris Thomas, 40ish year old computer nerd, husband and grandfather, located in Shropshire, UK.
There have been a few nerdy things recently that I've needed to keep a written note about... a few different Raspberry Pi install steps, mostly to do with rebuilding my magic mirror and getting that operational again (after the power supply took a dive and fried the original SD card), but rather than keep notes in a text file in some obscure directory on my pc, forever to languish in obscurity, I thought I'd write them up so that other people who are interested or Googling for similar problems in the future could find them and maybe my experiences will help. I could find a relevant forum to post these things, but then I'd have to keep track of all sorts of website links and logins and passwords, and to be honest I just can't be arsed.
Plus, with my own public blog, I can also show off the magic mirror build pictures, publish a few other silly things as they cross my mind (or when I find them, buried in the deep recesses of my hard disk), and maybe even vent my spleen as the UK is driven to destruction over the Brexit cliff edge.
Do feel free to join in and ask questions or comment, especially if it's to blow hot air up my ass and tell me how great I am.😉
Subscribe to:
Posts (Atom)